-
.Net
-
Backup
-
Data Storage Containers
-
Docker Containers
-
Environment Management
- Swap-Domains
- Clone Environment
- Create Environment
- Environment Aliases
- Environment Aliases
- Environment Migration between Regions
- Environment Regions
- Environment Transferring
- Environment Variable
- Environment Variables
- Environment Variables(Apache meaven, Memcached)
- Environment Variables(Go)
- Environment Variables(JAVA)
- Environment Variables(Load Balancer)
- Environment Variables(Node.js)
- Environment Variables(PHP)
- Environment Variables(Ruby)
- How to Migrate a WordPress Site to BitssCloud PaaS
- How to migrate my environments from another Jelastic provider?
- HTTP Headers
- Java VCS Deployment with Maven
- Setting Up Environment
- Share Environment
- Why is my environment in sleeping mode?
- Show all articles (9) Collapse Articles
-
Java
- Environment Variables - Java custom Environment Variables
- Java App server Configuration
- Java Options and Arguments
- Multiple Domains on Tomcat server
- Secure Java Encryption and Decryption
- Spring Boot Standalone and Clustered Java Applications with BitssCloud
- Timezone Data for Java/PHP App Server
- Tomcat HTTP to HTTPS redirect
- WildFly server
-
LiteSpeed Web Server
-
OOM Killer
-
Python
-
Reseller SetUp
-
Secure Socket Layer (SSL)
-
Troubleshooting
-
Account Management
-
CDN
-
Databases
- Database Configuration
- Database Connection Strings
- Database Hosting in BitssCloud
- Environment Variables(Database)
- Galera Cluster not working
- How to export/Import Database via Command line
- How to install MSSQL server on Linux (2017)
- MariaDB/MySQL Auto-Сlustering
- MongoDB Database Backups
- PostgreSQL Database Backups
- PostgreSQL Database Replication
- PostgreSQL Master-Slave Cluster
- Remote Access to PostgreSQL
- Schedule Backups for MySQL and MariaDB Databases
- Scheduling Databases Backups
-
Domain Name Management
- Container Redeploy
- Custom Domain Name
- DNS Hostnames for Direct Connection to Containers
- How to Bind Custom Domain via A Record
- How to Bind Custom Domain via CNAME
- Multiple Custom Domains on an Nginx Web Server
- Multiple Domains with Public IP
- Multiple Public IP Addresses for a Single Container
- Setup WordPress Multisite Network with Domain Mapping and CDN
-
Jenkins
-
Load Balancing
-
PHP
- Creating Environment for PHP
- Deploy PHP Project Via GIT SVN
- How to Check Change PHP Version in BitssCloud
- How to create environment for AngularJs/ReactJs
- How to Enable PHP Extensions
- How to Install Custom PHP Application
- Ion cube Loader
- MariaDB PHP connection
- MySQL PHP Connection
- NGINX PHP
- PHP App Server Configuration
- PHP Connection to MongoDB
- PHP security settings
- PHP Session Clustering
- PostgreSQL PHP Connection
- Running Multiple Domain Names on Apache Server
- Security configuration for Apache
- Zero Downtime (ZDT) Deployment for PHP
- Show all articles (3) Collapse Articles
-
Release Notes
-
Ruby
-
SSH
-
Wordpress
-
Application Management
-
Cluster
-
Deploying Projects
-
Elastic VPS
- CentOS VPS
- Elastic VPS configuratation
- Elastic VPS with full root access
- Installation of cPanel in BitssCloud
- Java Console Application with CentOS VPS
- Linux VPS Access via Public IP
- Linux VPS Access via SSH Gate
- Setting Mail Server Inside CentOS VPS
- Setting Mail Server Inside CentOS VPS
- SSH Access to VPS Gate
- Ubuntu VPS
- Ubuntu with CSF Firewall
-
High Availability
-
Jitsi
-
Node.js
-
Pricing System
-
Request Handling
-
Scaling
- Application Server with horizontal scaling
- Automatic Horizontal Scaling
- Automatic Horizontal Scaling: Multi Nodes
- Automatic Vertical Scaling
- Database Horizontal Scaling
- Docker Containers Horizontal Scaling
- Horizontal Scaling
- Load Balancer with horizontal scaling
- Memcached horizontal scaling
- Storage Container
- VPS Horizontal Scaling
-
Traffic Distributor
-
General
- Apache & NGINX Modules
- BitssCloud Dashboard Guide
- Build and Deploy Hooks
- Cron Job scheduler
- FFMPEG Setup
- File Synchronization
- FTP Overview
- FTP/FTPS Support in BitssCloud
- How to Deploy Magento into BitssCloud PHP Cloud
- How to Enable Expert Mode in JCA
- How to open a support ticket to BitssCloud
- Installation of FTP
- Kubernetes Cluster
- MarketPlace
- Reduce Cloud Waste with Automatically Scheduled Hibernation
- Run Configuration
- SFTP Protocols for Accessing BitssCloud Containers.
- Supported OS Distributions for Docker Containers
- Timezone Addon
- Two-Factor Authentication
- Types of Accounts
- Varnish
- Websockets Support
- What is Cloudlet
- What is PaaS & CaaS
- WordPress AddOn
- Zero Code Change Deploy with No Vendor Lock-In for Smooth Migration across Cloud Platforms
- Show all articles (12) Collapse Articles
-
Go lang
-
Wordpress category
-
Data Storage Container
-
Memcached
-
Account & Pricing
BitssCloud Usage-Based Pricing
BitssCloud PaaS provides a versatile pricing model, that can be adjusted to meet the requirements of the most demanding customers due to the number of awesome features:
- The resources are provisioned with granular units – cloudlets (128MiB of RAM and 400MHz of CPU). This allows to allocate exactly the needed amount of resources.
- Fully automatic vertical and horizontal scaling assure that you’ll be provided only with the required capacities without overpaying for unused resources.
- The system of automatic discounts makes the BitssCloud usage even more beneficial when the volume of ordered resources grows.
In contrast to the majority of other vendors, all of these features allow BitssCloud to provide a truly user-oriented Pay-per-Use charging approach:
The video below will help you to catch the key points of BitssCloud pricing system flexibility and the problems it helps to solve:
How It Works
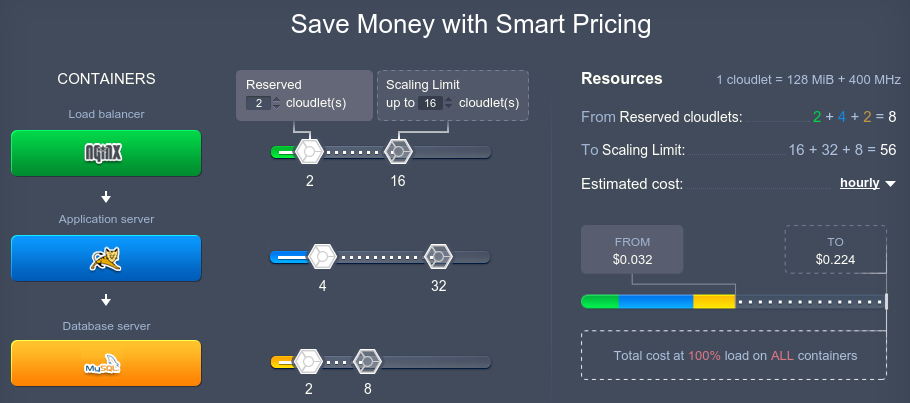
With automatic scaling you don’t need to guess or predict the incoming load. The platform will automatically adjust the amount of allocated to environment resources (within the stated scaling diapason) according to its current requirements.
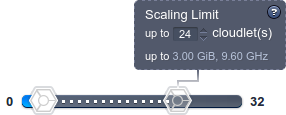
The Scaling Limit sets a maximum number of cloudlets that can be allocated for each server, so you can use it to define a maximum possible budget for your project. Subsequently, cloudlets will be automatically added to your servers based on application resource consumption. These are called Dynamic Cloudlets because they’re dynamically added (as your resource usage increases) and removed (as your resource usage decreases). So, you pay based on the actual hourly usage.
Since most applications need a certain amount of resources just to be loaded and ready to run, you’ll always consume a particular number of cloudlets regardless the load level. Therefore, you can allocate them beforehand with Reserved Cloudlets and benefit on automatic discounts.

These scaling ranges are configured individually for each server instance, so you can specify different limits for each container depending on your needs and preferences.
Setting Up Usage-Based Pricing
In order to apply such a usage-based pricing model to your environment, perform the following steps:
1. Set the Scaling Limit slider (the transparent one to the right)  to your desired maximum resource limit
Warning: Setting Scaling Limit too low for highly-loaded applications may cause their instability.
Since usage is calculated hourly, your cloudlet (RAM & CPU) consumption can go up and down throughout the day depending on application needs – so you automatically pay a lower price when you’re using fewer resources (e.g. during low traffic periods), and only pay more when additional resources are really needed (e.g. during high traffic periods).
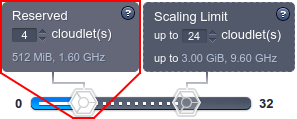
2. Set the Reserved Cloudlets slider (the left white-colored one)  to the desired value in order to commit the minimum amount of RAM & CPU that you expect to always need and get the discount for them. The exact discount size can vary by hosting provider and the overall number of Reserved Cloudletsin your environment (i.e. their sum for all nodes).
Example
In our example, the server has 4 Reserved cloudlets and a maximum limit of 24 Dynamic Cloudlets. With this configuration, the payment will be done as follows:
- if you use 4 cloudlets or less, you pay for 4 cloudlets based on discounted Reserved cloudlets price
- if you use e.g. 16 cloudlets, you pay for 4 cloudlets based on Reserved price (as they are already allocated) and for 12 cloudlets based on Dynamic price
Combining the Reserved and Dynamic cloudlets usage enables you to save your costs whilst remain prepared for the unexpected surges in application demands. Such an approach allows to handle all of the incoming requests during load peaks, and, at the same time, not to overpay for the unused resources.
