Deploy Java Project >Maven for deploy GIT/SVN
Deploy Your Java Project via GIT/SVN with Maven
Maven is a build automation and software comprehension tool which is primarily used for Java programming.
With Maven you can add any public or private project to BitssCloud and build them inside the cloud. BitssCloud takes your application’s source code directly from your version control system (SVN or Git) repository using the link, provided by you: http, https, or svn for SVN, and git, http, https or ftp for Git. It is fast and uses little bandwidth: you get the efficiency of the cloud and can keep using your computer without any extra load, while your project can stay unavailable for outsiders within your private Git/SVN repository.
To try it out, you can use our demo “Hello World” app. The corresponding SVN project is located at code.google.com – just visit this page and get the path to the repository from there for your Maven node in BitssCloud. If you prefer to work with Git, you may refer to this page and use the presented project for testing. We provide read-only projects as an example, so you don’t need to input any login/password. And now let’s see in detail how to add your private or public Java project from the remote repository and deploy it to your Cloudjiffy environment.
Create an Environment
1. Log in with your BitssCloud account credentials.
2. While in the BitssCloud dashboard, click the New environment button:

3. Switch to the Java programming language tab, pick an application server, select Maven as your build tool and specify your resource limits within the opened environment wizard. Then type your environment name, for example, myenv, and click Create.
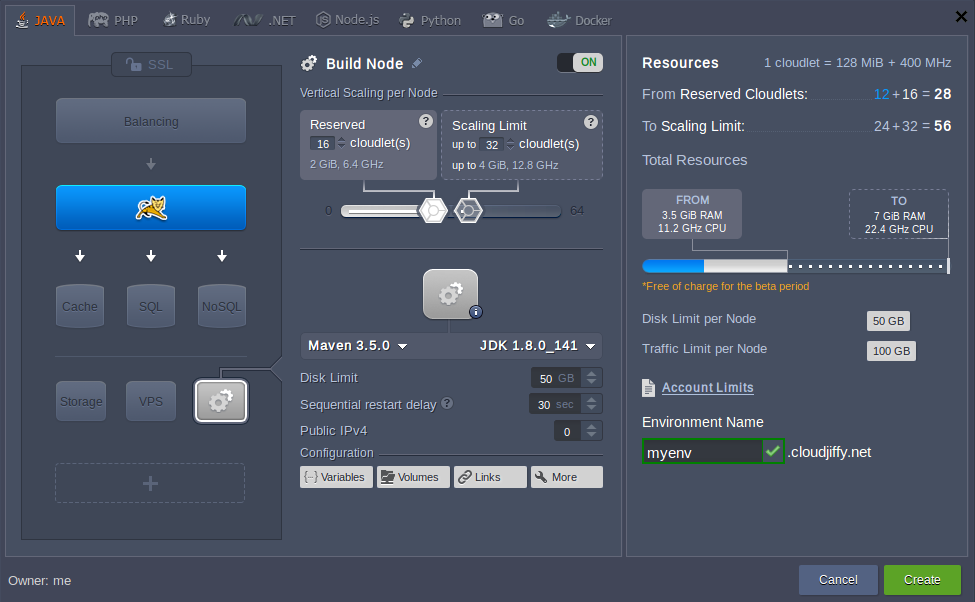
Note: The latest 3.3.3 version of the Maven build node does not support Java 6, thus you need to choose the higher engine version within the corresponding drop-down list for your application server.
In case you’ve created a pure Maven environment (i.e. without the app server inside), it is needed to change the engine version manually inside this container through editing the $JAVA_HOME variable:export JAVA_HOME=/path/to/jdk
Add a Project
1. Select the Add project icon next to Maven.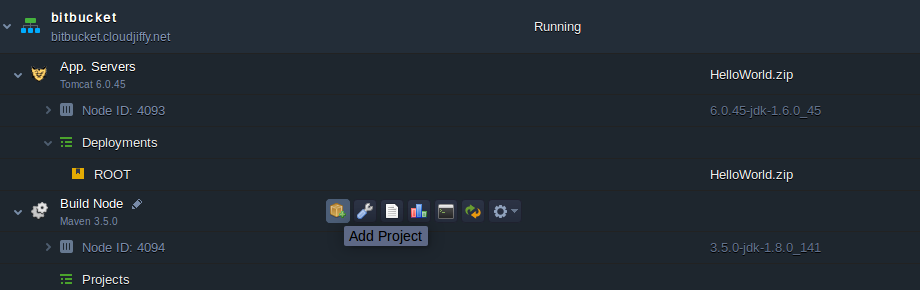

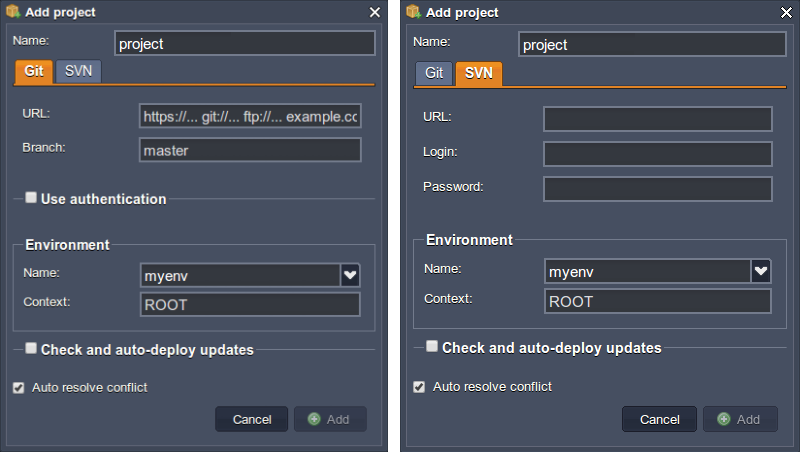
2. In the Add project dialog box, choose your revision control system (Git or SVN) and fill in the required fields:
- for Git
- Name of your project
- URL to your project (http, https, git or ftp link)
- Branch of your project
- Name and Context of your Environment the project will be deployed to
- for SVN
- Name of your project
- URL to your project (http, https or svn link)
- Login and Password of your repository (if this is required)
- Name and Context of your Environment the project will be deployed to
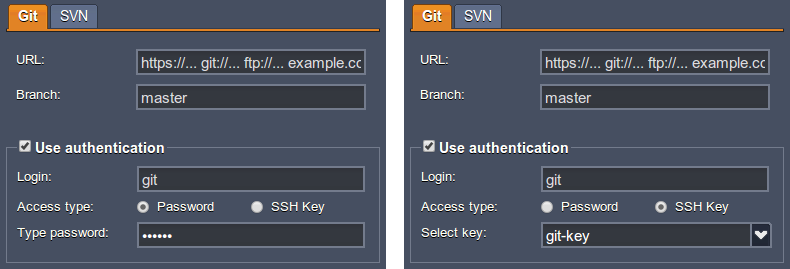
In case the Git repository you would like to access is private, put a tick to the Use authentication checkbox. You’ll see an additional section expanded, where you can enter your authentication data.
Firstly, choose the Access type you are going to use for connecting to your remote repository (Password or SSH key). Depending on the chosen option, fill in the following fields:
- enter your Git account credentials (Login and Password) for the Password access type
- type your Git account Login and choose the appropriate private SSH key from the Select key drop-down list for the SSH Key access type (more details on SSH authorization for GIT see here)
Also, you can configure some additional options here:
- Ticking the Check and auto-deploy updates checkbox will enable an automatic periodic re-deployment of your project from the repository, which is only performed if the repository contains new code changes. Use the Check every (min) option to define the required frequency of your project’s updates.
- The active by default Auto resolve conflict option represents an analogue of the git reset –hardcommand. It is used to prevent the occurrence of merge conflicts while further project updates, which can take place if the same file was modified in both remote repository and your project, hosted at BitssCloud Cloud. If such an issue arises, this contradictory file will be updated according to its repository version (which is considered as the correct one), discarding the locally made changes.Note: Please DO NOT disable this option if you don’t know exactly what you are doing.
Finally, select Add at the bottom of the frame.
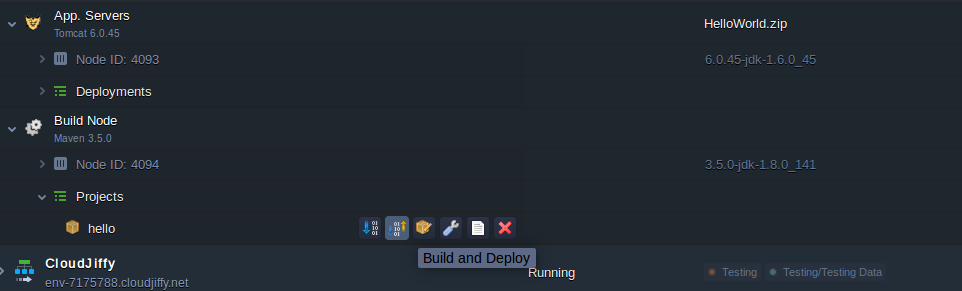
That’s all ! Now, just click on Build and deploy and access your application (using the Open in browser button) once these operations are completed.