
-
.Net
-
Backup
-
Data Storage Containers
-
Docker Containers
-
Environment Management
- Swap-Domains
- Clone Environment
- Create Environment
- Environment Aliases
- Environment Aliases
- Environment Migration between Regions
- Environment Regions
- Environment Transferring
- Environment Variable
- Environment Variables
- Environment Variables(Apache meaven, Memcached)
- Environment Variables(Go)
- Environment Variables(JAVA)
- Environment Variables(Load Balancer)
- Environment Variables(Node.js)
- Environment Variables(PHP)
- Environment Variables(Ruby)
- How to Migrate a WordPress Site to BitssCloud PaaS
- How to migrate my environments from another Jelastic provider?
- HTTP Headers
- Java VCS Deployment with Maven
- Setting Up Environment
- Share Environment
- Why is my environment in sleeping mode?
- Show all articles9 Collapse Articles
-
Java
- Environment Variables - Java custom Environment Variables
- Java App server Configuration
- Java Options and Arguments
- Multiple Domains on Tomcat server
- Secure Java Encryption and Decryption
- Spring Boot Standalone and Clustered Java Applications with BitssCloud
- Timezone Data for Java/PHP App Server
- Tomcat HTTP to HTTPS redirect
- WildFly server
-
LiteSpeed Web Server
-
OOM Killer
-
Python
-
Reseller SetUp
-
Secure Socket Layer (SSL)
-
Troubleshooting
-
Account Management
-
CDN
-
Databases
- Database Configuration
- Database Connection Strings
- Database Hosting in BitssCloud
- Environment Variables(Database)
- Galera Cluster not working
- How to export/Import Database via Command line
- How to install MSSQL server on Linux (2017)
- MariaDB/MySQL Auto-Сlustering
- MongoDB Database Backups
- PostgreSQL Database Backups
- PostgreSQL Database Replication
- PostgreSQL Master-Slave Cluster
- Remote Access to PostgreSQL
- Schedule Backups for MySQL and MariaDB Databases
- Scheduling Databases Backups
-
Domain Name Management
- Container Redeploy
- Custom Domain Name
- DNS Hostnames for Direct Connection to Containers
- How to Bind Custom Domain via A Record
- How to Bind Custom Domain via CNAME
- Multiple Custom Domains on an Nginx Web Server
- Multiple Domains with Public IP
- Multiple Public IP Addresses for a Single Container
- Setup WordPress Multisite Network with Domain Mapping and CDN
-
Jenkins
-
Load Balancing
-
PHP
- Creating Environment for PHP
- Deploy PHP Project Via GIT SVN
- How to Check Change PHP Version in BitssCloud
- How to create environment for AngularJs/ReactJs
- How to Enable PHP Extensions
- How to Install Custom PHP Application
- Ion cube Loader
- MariaDB PHP connection
- MySQL PHP Connection
- NGINX PHP
- PHP App Server Configuration
- PHP Connection to MongoDB
- PHP security settings
- PHP Session Clustering
- PostgreSQL PHP Connection
- Running Multiple Domain Names on Apache Server
- Security configuration for Apache
- Zero Downtime (ZDT) Deployment for PHP
- Show all articles3 Collapse Articles
-
Release Notes
-
Ruby
-
SSH
-
Wordpress
-
Application Management
-
Cluster
-
Deploying Projects
-
Elastic VPS
- CentOS VPS
- Elastic VPS configuratation
- Elastic VPS with full root access
- Installation of cPanel in BitssCloud
- Java Console Application with CentOS VPS
- Linux VPS Access via Public IP
- Linux VPS Access via SSH Gate
- Setting Mail Server Inside CentOS VPS
- Setting Mail Server Inside CentOS VPS
- SSH Access to VPS Gate
- Ubuntu VPS
- Ubuntu with CSF Firewall
-
High Availability
-
Jitsi
-
Node.js
-
Pricing System
-
Request Handling
-
Scaling
- Application Server with horizontal scaling
- Automatic Horizontal Scaling
- Automatic Horizontal Scaling: Multi Nodes
- Automatic Vertical Scaling
- Database Horizontal Scaling
- Docker Containers Horizontal Scaling
- Horizontal Scaling
- Load Balancer with horizontal scaling
- Memcached horizontal scaling
- Storage Container
- VPS Horizontal Scaling
-
Traffic Distributor
-
General
- Apache & NGINX Modules
- BitssCloud Dashboard Guide
- Build and Deploy Hooks
- Cron Job scheduler
- FFMPEG Setup
- File Synchronization
- FTP Overview
- FTP/FTPS Support in BitssCloud
- How to Deploy Magento into BitssCloud PHP Cloud
- How to Enable Expert Mode in JCA
- How to open a support ticket to BitssCloud
- Installation of FTP
- Kubernetes Cluster
- MarketPlace
- Reduce Cloud Waste with Automatically Scheduled Hibernation
- Run Configuration
- SFTP Protocols for Accessing BitssCloud Containers.
- Supported OS Distributions for Docker Containers
- Timezone Addon
- Two-Factor Authentication
- Types of Accounts
- Varnish
- Websockets Support
- What is Cloudlet
- What is PaaS & CaaS
- WordPress AddOn
- Zero Code Change Deploy with No Vendor Lock-In for Smooth Migration across Cloud Platforms
- Show all articles12 Collapse Articles
-
Go lang
-
Wordpress category
-
Data Storage Container
-
Memcached
-
Account & Pricing
Environment Transferring
Within BitssCloud, you can move any environment that you own to another BitssCloud account through environment transferring.
Environment transferring allows you to move any environment to another BitssCloud account within the same platform (confirmation on both sides is required).
Reasons
The feature can be beneficial in many cases. For example, if you need to :
- move all your projects to a new account, registered with a different email address.
- transfer your work projects to another developer’s account in case of an employee leaving the company
- move a production-ready environment to the main company account from the personal testing one
- restore environments at the old deactivated account without its reactivation
Tip: Also, service hosting providers can offer a service of creating the required application for you. After configuration and testing, the production-ready environment will be transferred to your account.
Conditions
Any environment (stopped/running) can be transferred from any account (including deactivated ones). However, a target account should meet the following requirements:
- type – can be of any type (beta, billing), except trail accounts
- status – should be active (i.e. not suspended or deactivated)
- quotas – should have sufficient quotas (limitations) to add to the environment
Note: On the platforms before the 5.9.3 version, environments can be transferred to the billing accounts only.
For example, some quotas checked during the transfer: cloudlets per container, nodes per environment, environments on account, public IP / VPS / high-availability features (if they are enabled in the transferred environment), etc.
Also, in case of an error, you’ll see the corresponding notification directly on the dashboard:
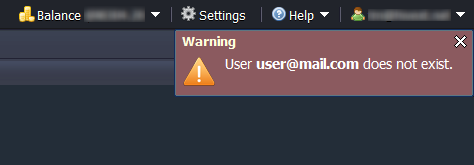
Note: The environment transferring feature is currently not available between accounts at different Jelastic installations, including main platform – sub-platform (reseller) interactions.
Result
No changes are applied to the environment after transferring. The new owner receives it in the same state, with the same applications deployed, and with the same custom configurations. All the consequent charges for the environment will be applied to the new owner as well.
Also, the transferred environment becomes unshared by all the users that had access to it.
Transferring StepsAnd now let’s see the process of transferring an environment, step by step.
1. Click the Settings button next to the desired environment.![]()
2. In the opened tab, navigate to the Change Owner section and enter the email address of a target user (potential new environment’s owner). ![]()
Click the Send Request button to proceed.
3. If a target account exists and meets all the requirements, you will see a notification that the request has been sent.![]()
4. The specified user will receive a request for an environment transfer with a confirmation URL via email.
Note: While waiting for a new owner’s confirmation, the environment is marked with a custom icon on the initial owner’s dashboard.![]()
5. In the case you would like to cancel a still unconfirmed transfer request you’ve initiated, navigate to the same Settings > Change Owner section and click the Cancel Request button.![]()
Press Yes in the appeared confirmation window.![]()
6. When the target user confirms the transfer request (clicks a link from the email), the environment is removed from the initial user’s dashboard and appears for a new owner. Email notification about successful transfer will be sent to the initial owner. Note: During this step, the target account is validated (to have sufficient limits) for the last time. If it doesn’t meet the requirements, the transferring process will be stopped. The appropriate error message will be displayed at the target user dashboard and sent to the initial owner via email.
It’s that simple. Using this method, you can transfer your environments to the required accounts.