-
.Net
-
Backup
-
Data Storage Containers
-
Docker Containers
-
Environment Management
- Swap-Domains
- Clone Environment
- Create Environment
- Environment Aliases
- Environment Aliases
- Environment Migration between Regions
- Environment Regions
- Environment Transferring
- Environment Variable
- Environment Variables
- Environment Variables(Apache meaven, Memcached)
- Environment Variables(Go)
- Environment Variables(JAVA)
- Environment Variables(Load Balancer)
- Environment Variables(Node.js)
- Environment Variables(PHP)
- Environment Variables(Ruby)
- How to Migrate a WordPress Site to BitssCloud PaaS
- How to migrate my environments from another Jelastic provider?
- HTTP Headers
- Java VCS Deployment with Maven
- Setting Up Environment
- Share Environment
- Why is my environment in sleeping mode?
- Show all articles9 Collapse Articles
-
Java
- Environment Variables - Java custom Environment Variables
- Java App server Configuration
- Java Options and Arguments
- Multiple Domains on Tomcat server
- Secure Java Encryption and Decryption
- Spring Boot Standalone and Clustered Java Applications with BitssCloud
- Timezone Data for Java/PHP App Server
- Tomcat HTTP to HTTPS redirect
- WildFly server
-
LiteSpeed Web Server
-
OOM Killer
-
Python
-
Reseller SetUp
-
Secure Socket Layer (SSL)
-
Troubleshooting
-
Account Management
-
CDN
-
Databases
- Database Configuration
- Database Connection Strings
- Database Hosting in BitssCloud
- Environment Variables(Database)
- Galera Cluster not working
- How to export/Import Database via Command line
- How to install MSSQL server on Linux (2017)
- MariaDB/MySQL Auto-Сlustering
- MongoDB Database Backups
- PostgreSQL Database Backups
- PostgreSQL Database Replication
- PostgreSQL Master-Slave Cluster
- Remote Access to PostgreSQL
- Schedule Backups for MySQL and MariaDB Databases
- Scheduling Databases Backups
-
Domain Name Management
- Container Redeploy
- Custom Domain Name
- DNS Hostnames for Direct Connection to Containers
- How to Bind Custom Domain via A Record
- How to Bind Custom Domain via CNAME
- Multiple Custom Domains on an Nginx Web Server
- Multiple Domains with Public IP
- Multiple Public IP Addresses for a Single Container
- Setup WordPress Multisite Network with Domain Mapping and CDN
-
Jenkins
-
Load Balancing
-
PHP
- Creating Environment for PHP
- Deploy PHP Project Via GIT SVN
- How to Check Change PHP Version in BitssCloud
- How to create environment for AngularJs/ReactJs
- How to Enable PHP Extensions
- How to Install Custom PHP Application
- Ion cube Loader
- MariaDB PHP connection
- MySQL PHP Connection
- NGINX PHP
- PHP App Server Configuration
- PHP Connection to MongoDB
- PHP security settings
- PHP Session Clustering
- PostgreSQL PHP Connection
- Running Multiple Domain Names on Apache Server
- Security configuration for Apache
- Zero Downtime (ZDT) Deployment for PHP
- Show all articles3 Collapse Articles
-
Release Notes
-
Ruby
-
SSH
-
Wordpress
-
Application Management
-
Cluster
-
Deploying Projects
-
Elastic VPS
- CentOS VPS
- Elastic VPS configuratation
- Elastic VPS with full root access
- Installation of cPanel in BitssCloud
- Java Console Application with CentOS VPS
- Linux VPS Access via Public IP
- Linux VPS Access via SSH Gate
- Setting Mail Server Inside CentOS VPS
- Setting Mail Server Inside CentOS VPS
- SSH Access to VPS Gate
- Ubuntu VPS
- Ubuntu with CSF Firewall
-
High Availability
-
Jitsi
-
Node.js
-
Pricing System
-
Request Handling
-
Scaling
- Application Server with horizontal scaling
- Automatic Horizontal Scaling
- Automatic Horizontal Scaling: Multi Nodes
- Automatic Vertical Scaling
- Database Horizontal Scaling
- Docker Containers Horizontal Scaling
- Horizontal Scaling
- Load Balancer with horizontal scaling
- Memcached horizontal scaling
- Storage Container
- VPS Horizontal Scaling
-
Traffic Distributor
-
General
- Apache & NGINX Modules
- BitssCloud Dashboard Guide
- Build and Deploy Hooks
- Cron Job scheduler
- FFMPEG Setup
- File Synchronization
- FTP Overview
- FTP/FTPS Support in BitssCloud
- How to Deploy Magento into BitssCloud PHP Cloud
- How to Enable Expert Mode in JCA
- How to open a support ticket to BitssCloud
- Installation of FTP
- Kubernetes Cluster
- MarketPlace
- Reduce Cloud Waste with Automatically Scheduled Hibernation
- Run Configuration
- SFTP Protocols for Accessing BitssCloud Containers.
- Supported OS Distributions for Docker Containers
- Timezone Addon
- Two-Factor Authentication
- Types of Accounts
- Varnish
- Websockets Support
- What is Cloudlet
- What is PaaS & CaaS
- WordPress AddOn
- Zero Code Change Deploy with No Vendor Lock-In for Smooth Migration across Cloud Platforms
- Show all articles12 Collapse Articles
-
Go lang
-
Wordpress category
-
Data Storage Container
-
Memcached
-
Account & Pricing
MariaDB PHP connection
Connection to MySQL/MariaDB for PHP
MySQL and MariaDB are highly popular open-source databases, used by developers all over the world. Follow the instruction below to learn how to connect your PHP application, hosted within BitssCloud , to one of these DB servers.
Environment Creation
1. Log into your BitssCloud dashboard.
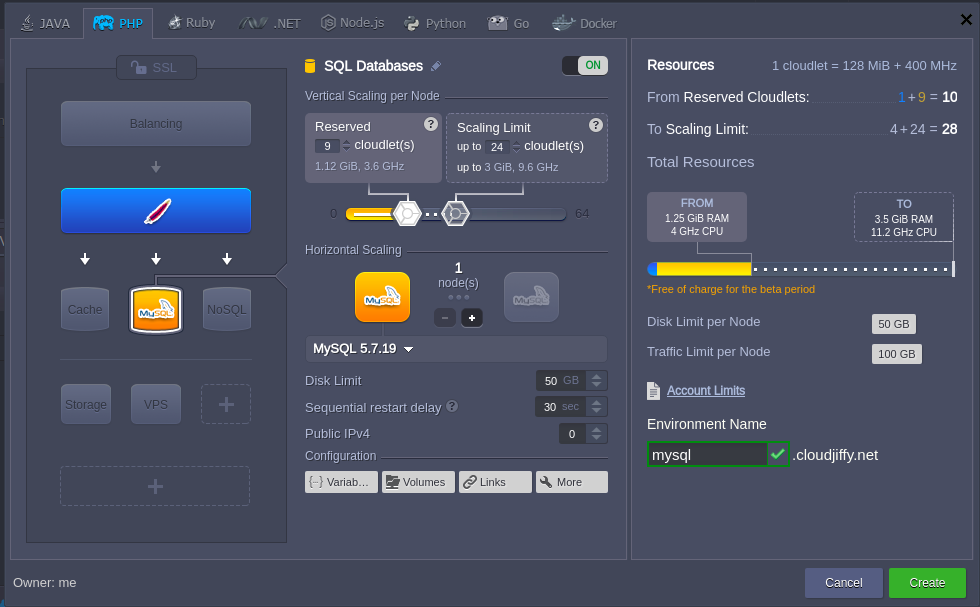
2. Create an environment with MySQL or MariaDB database server (both are available within the SQLwizard section).

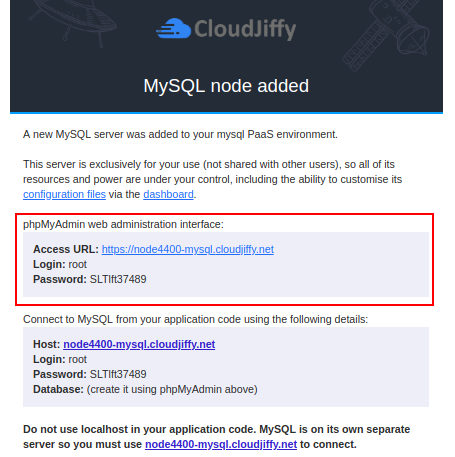
3. Check your email – it should contain a message from Robot@jelastic with the administration details (access URL, login and password) for your MySQL or MariaDB server.

4. Return to your dashboard and click the Open in browser button for the corresponding MySQL or MariaDB node in your environment.
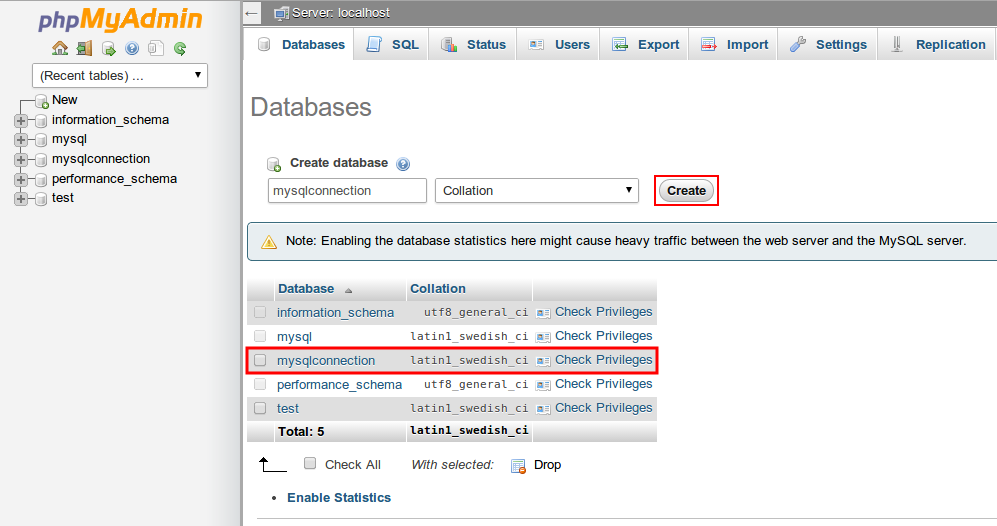
Log in to the opened admin panel using the information you’ve received in the abovementioned email. Here you can create new databases (just in the same way as it is shown in the image below for the mysqlconnection one) for your application’s data storing and manage them.

5. Now you can upload your PHP application package to the BitssCloud Deployment manager and deploy it to the created environment (or perform the deployment from your GIT/SVN repository).
Connection to the Database
Once your project is successfully deployed, you need to connect it to your database. For that, your application should be appropriately configured.
There are 3 main PHP functions, used for DB connection.
1. String for establishing a connection to your MySQL/MariaDB node:
mysql_connect(‘HOST’, ‘USERNAME’, ‘PASSWORD’);
The appropriate values should be substituted with your data:
- HOST – MySQL server address that you’ve received via email, specified without the https:// part:
{db_type}{node_id}-{env_name}.{hoster_domain} - where
{db_type} – depends on the type of database server you’ve chosen
{node_id} – ID of the container with the database server you want to establish the connection to. It can be seen at the dashboard:

- USERNAME – the name of the admin DB user; the default one is root.
- PASSWORD – password for your DB server; the default one can be also seen inside the email with database credentials.
2. For selection of the necessary database, use the next string:
mysql_select_db(‘DB_NAME’);
wherein the DB_NAME parameter should be substituted with the name of the needed database.
3. In order to close a connection to your database, execute the following:
mysql_close( );
All other available MySQL functions can be found here.
| You need to specify the necessary functions in every *.php page, which should be connected to the database. |
Checking the Connection
In order to ensure everything works fine, you can check the connection using this code:
| 1234567891011 | <?php$link = mysql_connect('HOST', 'USERNAME', 'PASSWORD');//if connection is not successful you will see text errorif (!$link) { die('Could not connect: ' . mysql_error());}//if connection is successfuly you will see message bellowecho 'Connected successfully'; mysql_close($link);?> |
| Note: Do not forget to substitute HOST, USERNAME, and PASSWORD in the connection string with the corresponding values (as it is described in the Connection to the Database section of this instruction.) |
