-
.Net
-
Backup
-
Data Storage Containers
-
Docker Containers
-
Environment Management
- Swap-Domains
- Clone Environment
- Create Environment
- Environment Aliases
- Environment Aliases
- Environment Migration between Regions
- Environment Regions
- Environment Transferring
- Environment Variable
- Environment Variables
- Environment Variables(Apache meaven, Memcached)
- Environment Variables(Go)
- Environment Variables(JAVA)
- Environment Variables(Load Balancer)
- Environment Variables(Node.js)
- Environment Variables(PHP)
- Environment Variables(Ruby)
- How to Migrate a WordPress Site to BitssCloud PaaS
- How to migrate my environments from another Jelastic provider?
- HTTP Headers
- Java VCS Deployment with Maven
- Setting Up Environment
- Share Environment
- Why is my environment in sleeping mode?
- Show all articles (9) Collapse Articles
-
Java
- Environment Variables - Java custom Environment Variables
- Java App server Configuration
- Java Options and Arguments
- Multiple Domains on Tomcat server
- Secure Java Encryption and Decryption
- Spring Boot Standalone and Clustered Java Applications with BitssCloud
- Timezone Data for Java/PHP App Server
- Tomcat HTTP to HTTPS redirect
- WildFly server
-
LiteSpeed Web Server
-
OOM Killer
-
Python
-
Reseller SetUp
-
Secure Socket Layer (SSL)
-
Troubleshooting
-
Account Management
-
CDN
-
Databases
- Database Configuration
- Database Connection Strings
- Database Hosting in BitssCloud
- Environment Variables(Database)
- Galera Cluster not working
- How to export/Import Database via Command line
- How to install MSSQL server on Linux (2017)
- MariaDB/MySQL Auto-Сlustering
- MongoDB Database Backups
- PostgreSQL Database Backups
- PostgreSQL Database Replication
- PostgreSQL Master-Slave Cluster
- Remote Access to PostgreSQL
- Schedule Backups for MySQL and MariaDB Databases
- Scheduling Databases Backups
-
Domain Name Management
- Container Redeploy
- Custom Domain Name
- DNS Hostnames for Direct Connection to Containers
- How to Bind Custom Domain via A Record
- How to Bind Custom Domain via CNAME
- Multiple Custom Domains on an Nginx Web Server
- Multiple Domains with Public IP
- Multiple Public IP Addresses for a Single Container
- Setup WordPress Multisite Network with Domain Mapping and CDN
-
Jenkins
-
Load Balancing
-
PHP
- Creating Environment for PHP
- Deploy PHP Project Via GIT SVN
- How to Check Change PHP Version in BitssCloud
- How to create environment for AngularJs/ReactJs
- How to Enable PHP Extensions
- How to Install Custom PHP Application
- Ion cube Loader
- MariaDB PHP connection
- MySQL PHP Connection
- NGINX PHP
- PHP App Server Configuration
- PHP Connection to MongoDB
- PHP security settings
- PHP Session Clustering
- PostgreSQL PHP Connection
- Running Multiple Domain Names on Apache Server
- Security configuration for Apache
- Zero Downtime (ZDT) Deployment for PHP
- Show all articles (3) Collapse Articles
-
Release Notes
-
Ruby
-
SSH
-
Wordpress
-
Application Management
-
Cluster
-
Deploying Projects
-
Elastic VPS
- CentOS VPS
- Elastic VPS configuratation
- Elastic VPS with full root access
- Installation of cPanel in BitssCloud
- Java Console Application with CentOS VPS
- Linux VPS Access via Public IP
- Linux VPS Access via SSH Gate
- Setting Mail Server Inside CentOS VPS
- Setting Mail Server Inside CentOS VPS
- SSH Access to VPS Gate
- Ubuntu VPS
- Ubuntu with CSF Firewall
-
High Availability
-
Jitsi
-
Node.js
-
Pricing System
-
Request Handling
-
Scaling
- Application Server with horizontal scaling
- Automatic Horizontal Scaling
- Automatic Horizontal Scaling: Multi Nodes
- Automatic Vertical Scaling
- Database Horizontal Scaling
- Docker Containers Horizontal Scaling
- Horizontal Scaling
- Load Balancer with horizontal scaling
- Memcached horizontal scaling
- Storage Container
- VPS Horizontal Scaling
-
Traffic Distributor
-
General
- Apache & NGINX Modules
- BitssCloud Dashboard Guide
- Build and Deploy Hooks
- Cron Job scheduler
- FFMPEG Setup
- File Synchronization
- FTP Overview
- FTP/FTPS Support in BitssCloud
- How to Deploy Magento into BitssCloud PHP Cloud
- How to Enable Expert Mode in JCA
- How to open a support ticket to BitssCloud
- Installation of FTP
- Kubernetes Cluster
- MarketPlace
- Reduce Cloud Waste with Automatically Scheduled Hibernation
- Run Configuration
- SFTP Protocols for Accessing BitssCloud Containers.
- Supported OS Distributions for Docker Containers
- Timezone Addon
- Two-Factor Authentication
- Types of Accounts
- Varnish
- Websockets Support
- What is Cloudlet
- What is PaaS & CaaS
- WordPress AddOn
- Zero Code Change Deploy with No Vendor Lock-In for Smooth Migration across Cloud Platforms
- Show all articles (12) Collapse Articles
-
Go lang
-
Wordpress category
-
Data Storage Container
-
Memcached
-
Account & Pricing
Installation of cPanel in BitssCloud
Install Cpanel in elastic VPS-
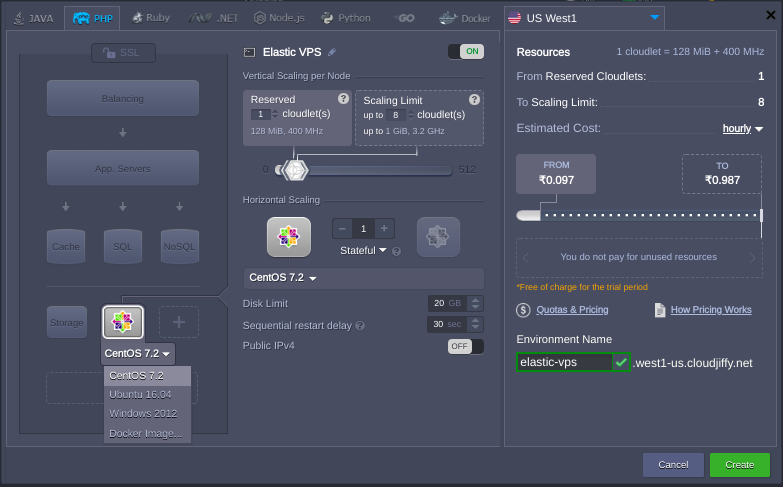
1. Firstly, log in to your BitssCloud account and access the environment topology wizard.
2. Herein, click on the VPS section at the bottom left corner and choose the needed VPS (CentOS 7.2 in our example) from the expandable options list.
3. Specify cloudlet limits for this node, scale it out (if required), select the preferred region (if several of them are available), type the name of the environment, and click on Create.
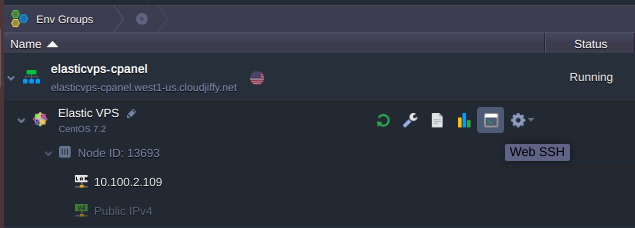
4. In a couple of minutes, your new environment with the chosen virtual server will appear at the dashboard. You’ll also receive an email notification with its administration data (i.e. login/password credentials, attached Public IP and access URL).
5. Now, your virtual private server is up and running.
6. You can view the Public IP address directly in the dashboard. If you’ve lost access to your VPS server or want to change the admin credentials for it, click the Reset Password button as it is shown in the image above.
—>To install cpanel/WHM on elastic VPS:
1. Take an SSH from your VPS server.
2. You can easily install the package perl-Exporter by the command:
–>yum update -y
–>yum install perl-Exporter”
3. You can install cPanel via below command-
cd /home && curl -o latest -L https://securedownloads.cpanel.net/latest && sh latest
